
Learn Git 101

What is Git ?
Git is the most popular and widely used modern source control system.
It is a mature, actively maintained open source project originally developed by Linus Torvalds in 2005 for the Linux kernel development.
Git allows to track and provide control over changes in the source code, configuration files or documentation over time.
Why use Git ?
Git have severals benefits:
Performance:Git provides the best performance when it comes to version control systems. Committing, branching, merging all are optimized for a better performance than other systems.Security:Using SHA-1 cryptographic method, it manages your versions, files, and directory securely so that your work is not corrupted.Disaster Recovery:Since all the project is versionned, it allows easy roll back to a previous working version.Flexibility:It supports several kinds of nonlinear development workflows and its efficiency in handling both small scale and large scale projects. It is uniquely designed to support tagging and branching operations and store each and every activity carried out by the user as an integral part of the change history.Distributed:The codebase is mirrored onto the developer’s system so that he can work on it only.Open Source:Being open source invites the developers from all over the world to contribute to the software and make it more and more powerful through features and additional plugin or tools.
First steps into Git
Creating a git repository
Github is not Git, there are two separate things, to avoid any confusion, let’s keep it about Git.
By only focusing on Git, you will be able to assimilate Git concepts much faster and then be able to use them with Github.
It’s time to start your HelloWorld project by creating a folder to store all the source files.
For now it’s a regular folder, let’s turn it into a git repository by simply run the git init command.
> git init
Initialized empty Git repository in /your/path/helloworld/.git/
Staging changes
Create a README.md and a sh file
> echo "My HelloWorld project" > README.md
> echo "echo HelloWorld" > helloworld.sh
You can check the working tree status of our repository by running the git status command.
> git status
On branch master

No commits yet

Untracked files:
  (use "git add <file>..." to include in what will be committed)
        README.md
        helloworld.sh

nothing added to commit but untracked files present (use "git add" to track)
Two files were created but your repository is still empty.
The reason is because you need to explicitly tell git to take a snapshot of your changes.
Each snapshot (or version) is called a commmit and is uniquely identify by a hash.
To take a snapshot, you need to first staging the files you created or modified and then committing them. When files are created they are untracked by git, that means it has no idea about them. Staging a file, tell git to take the changes in that file into consideration when you take a snapshot of your repository.
To stage a file, simply run the git add command
> git add README.md
Let’s check the status again
> git status
On branch master

No commits yet

Changes to be committed:
  (use "git rm --cached <file>..." to unstage)
        new file:   README.md

Untracked files:
  (use "git add <file>..." to include in what will be committed)
        helloworld.sh
Excellent, now you can see that the README file is staging and ready to be committed to the repository. Git will includes all changes (adding, removing, modifying) in staged file when you will take a snapshot.
Committing changes
You need to create a commit now, using the git commit command with -m option to provide a descriptive commit message.
> git commit -m "Starting my awesome helloworld project"
Add another commit for the script file
> git add helloworld.sh
> git commit -m "Add helloworld.sh"
Note: It’s possible to add multiple files in one commit
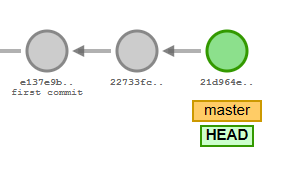
So now, you have two commits in your repository. Each commit has its own unique identifier and stored with a pointer to its parent commit.
Using branches
Git allows you to branch out from the default main branch (by default called master).
What’s the point of branching ?
Assume you want to add a new feature on your HelloWorld project without risking the stability of you existing codebase. The idea it’s to create a feature branch and develop/refactor without any risk.
Branch are really useful especially when your are working collaboratively, on breaking change, on features, etc…
Let’s create a create a new branch a new feature, using the git branch command
> git branch feature
The command only create the branch, but you are still on the master branch. To switch branch to another, use the git checkout command
> git checkout feature
Switched to branch `feature`
Note: When it’s a new branch you can create and switch to it with one command git checkout -b feature
Modify the README file and create a commit in the feature branch
> git add README
> git commit -m "Modify README"
Switch back to master and take a look on the README file, you can see the modification is not reflected.
That shows both branch can be worked separately with any risk and reflect on each other.
Now, modify the sh file and create a new commit on the master branch. Your git graph now looks like that.
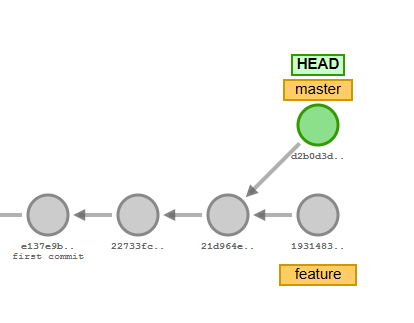
Each branch lives separatly.
Merge branches
Ok, so now you have developed your feature, and you want bring back all in the master branch to deliver it. There is no point to branch out without being able to merge it back together. Let’s see how it work.
Git offers several ways to merge branch but the simplest one is git merge command.
To merge the feature branch into the master branch, make sure you are on the master and run the following
> git merge feature
Git has created a new commit that has two parents from both branches and now the git graph looks like
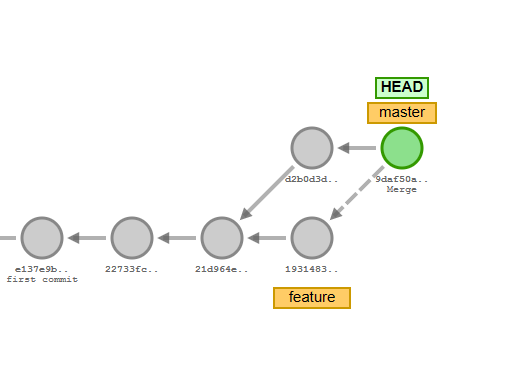
If you look to the README file, you can see that the modification done on the feature branch are now on the master branch as well.
To simulate command and see what the graph looks like, you can use visualizing-git
Resolve merge conflicts
Be aware that conflicts on merge can happen, it essentially means that the two branches have modified the same part(s) of the same file(s).
When this happens, git will prompt you to resolve the conflicts first before resuming the merge.
Merge conflicts are a very careful process to ensure to take the wanted change, otherwise, bad things could happen.
> git merge feature

Auto-merging README.md
CONFLICT (content): Merge conflict in README.md
Automatic merge failed; fix conflicts and then commit the result.
> cat README.md

My HelloWorld project
<<<<<<< HEAD
Awesome project
=======
My new feature
>>>>>>> feature
Pull / Push
You works on local repository but git allows you to have copies of your codebase on remote repositories. Create a Github repository and configure your remote to point on it.
> git remote add origin https://github.com/XXXXXX/helloworld.git
With remote you can share codebase with colleagues and works collaboratively on the project. But also from a disaster recovery perspective, if you completly loose your local repository there is still a copy of it.
To get new changes from the remote, run the git pull command and to put your changes on it, run the git push command.
Be sure to allways execute the pull command before the push one.