
Jenkins on top of a kubernetes cluster
How to setup Jenkins on top of a k8s (kubernetes) cluster walkthrough
To setup this stack, we will do the following:
- Setup a k8s sandbox
- Create a Namespace
- Create and deploy a Persistent Volume and Persistent Volume Claim yaml
- Create and deploy the Jenkins deployment yaml
- Create and deploy service yaml
- Access Jenkins
- To infinity and beyond …
Setting up the k8s sandbox
To be able to setup Jenkins in a k8s cluster, we definitely need a fully runing k8s cluster. As this walkthrough is not about setting up a cluster from scratch, we will use a local cluster.
Please be aware, that is for testing purpose only, I would recommend taking a look to the Kubernetes official documentation if you want to setup a real cluster from scratch.
I will use Minikube, which has been developed to run a single node Kubernetes cluster on your local machine. Note that you will have to install a Hypervisor.
You can also use any other tool you want or even a real cluster, you might have to adapt the Persistent Volume Claim part based on your tool.
The installation step for Windows, Linux or macOS are available here
To run minikube after its installation:
minikube start
To confirm that minikube is up and running:
minikube status
To stop minikube:
minikube stop
Also, we need to install the Kubernetes command line interface to interact with our cluster.
MacOS
curl -LO "https://storage.googleapis.com/kubernetes-release/release/$(curl -s https://storage.googleapis.com/kubernetes-release/release/stable.txt)/bin/darwin/amd64/kubectl"

chmod +x kubectl && sudo mv kubectl /usr/local/bin/kubectl
Windows (v1.21.0)
curl -LO https://storage.googleapis.com/kubernetes-release/release/v1.21.0/bin/windows/amd64/kubectl.exe
Add binary to your PATH
Linux
curl -LO https://storage.googleapis.com/kubernetes-release/release/`curl -s https://storage.googleapis.com/kubernetes-release/release/stable.txt`/bin/linux/amd64/kubectl

chmod +x kubectl && sudo mv kubectl /usr/local/bin/kubectl
Creating the Namespace
Why should I need a namespace ?
Namespaces allow isolation in the cluster. We definitely want one in our CI/CD environment. To do so, we can use either kubectl command or yaml file:
Kubectl
kubectl create ns jenkins
yaml
apiVersion: v1
kind: Namespace
metadata:
  name: jenkins
kubectl apply -f jenkins-namespace.yaml
Now that we have our namespace, we can proceed with persistency.
Persistent Volume and Persistent Volume Claim
Why should I need a PV and PVC ?
We want our Jenkins to be resilient. We really don’t want to lose our setup when the pod crashes, restarts or when we stop minikube.
As we are on a local single node cluster, we use a hostPath Persistent Volume. According to the documentation,
A hostPath PersistentVolume uses a file or directory on the Node to emulate network-attached storage.
apiVersion: v1
kind: PersistentVolume
metadata:
  name: jenkins-pv
  namespace: jenkins
  labels:
    type: local
spec:
  capacity:
    storage: 5Gi
  accessModes:
    - ReadWriteOnce
  hostPath:
    path: "/data/jenkins-data"
Note: Minikube is configured so that files persist when stored under some directories (list here); data is one on them. Change the path according your setup.
To request physical storage, we need a PersistentVolumeClaim, here is the configuration:
apiVersion: v1
kind: PersistentVolumeClaim
metadata:
  name: jenkins-pvc
  namespace: jenkins
spec:
  storageClassName: standard
  accessModes:
    - ReadWriteOnce
  resources:
    requests:
      storage: 5Gi
Create PV and PVC:
kubectl apply -f jenkins-volumes.yaml
As you can read in the official documentation:
After you create the PersistentVolumeClaim, the Kubernetes control plane looks for a PersistentVolume that satisfies the claim’s requirements. If the control plane finds a suitable PersistentVolume with the same StorageClass, it binds the claim to the volume.
Let’s check that:
kubectl get pv -n jenkins

NAME         CAPACITY   ACCESS MODES   RECLAIM POLICY   STATUS   CLAIM                 STORAGECLASS   REASON   AGE
jenkins-pv   5Gi        RWO            Retain           Bound    jenkins/jenkins-pvc   manual                  2m

kubectl get pvc -n jenkins
NAME          STATUS   VOLUME       CAPACITY   ACCESS MODES   STORAGECLASS   AGE
jenkins-pvc   Bound    jenkins-pv   5Gi        RWO            manual         2m
Perfect, our PV and PVC are bound together.
Note : Minikube comes with something called Dynamic provisiong and CSI. It will create for us a PV based on the PVC we have declared so, with minikube, we don’t really need to create the PV yaml. As this feature is only on minikube and, on a real cluster, you will need to create the PV, we are creating it.
Deploying Jenkins
Finally, we are starting to deploy our Jenkins on top of the cluster. The deployment file look like:
apiVersion: apps/v1
kind: Deployment
metadata:
  name: jenkins
  namespace: jenkins
spec:
  replicas: 1
  selector:
    matchLabels:
      app: jenkins
  template:
    metadata:
      labels:
        app: jenkins
    spec:
      containers:
        - name: jenkins
          image: jenkins/jenkins
          ports:
            - name: http-ui
              containerPort: 8080
          volumeMounts:
            - name: jenkins-home
              mountPath: /var/jenkins_home
      volumes:
        - name: jenkins-home
          persistentVolumeClaim:
            claimName: jenkins-pvc
As we are in a local cluster, we will have only one pod based on the official Jenkins’ image.
Jenkins has its configuration in /var/jenkins_home, which is why we are mounting our volume on that path. For further information about k8s deployment, you can refer to the official documentation
Now we apply our deployment:
kubectl apply -f jenkins-deployment.yaml
Let’s check if everything is alright with our deployment. You should see the pod in a running status.
kubectl get pods -n jenkins
Creating a Service
I alreday have my deployment, why should I need to create a service ?
Currently, our Jenkins is not accessible to the outside world, only within the cluster. Not really useful right ?
To access the Jenkins container from outside world, we should create a service and map it to the deployment.
More details about service publishing here
Our service looks like:
apiVersion: v1
kind: Service
metadata:
  name: jenkins
  namespace: jenkins
spec:
  type: NodePort
  selector:
    app: jenkins
  ports:
    - name: http-ui
      port: 8080
      targetPort: 8080
      nodePort: 30000
In this file, we are using the type NodePort which will expose Jenkins on all kubernetes node IPs on port 30000.
This is a lab configuration, you should use an ingress for production environment
Let’s create it:
kubectl apply -f jenkins-services.yaml

// Get NodeIp
kubectl get node -o wide
We can acces it by requesting http://<NodeIP>:30000
Accessing Jenkins
Jenkins will ask for the initial Admin password, which you can get from the pod logs.
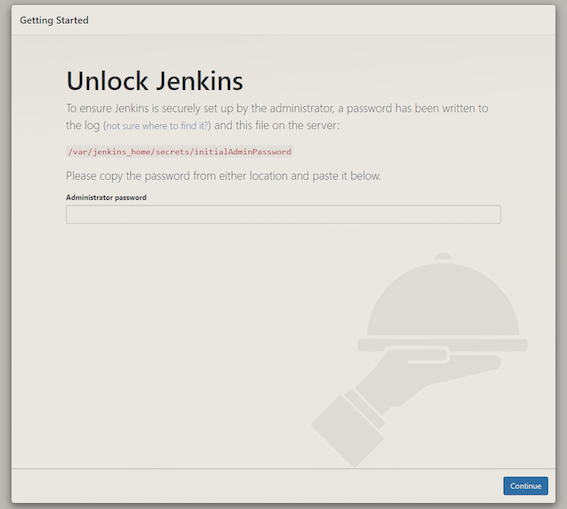
kubectl logs <PodName> -n jenkins

...
*************************************************************
*************************************************************
*************************************************************

Jenkins initial setup is required. An admin user has been created and a password generated.
Please use the following password to proceed to installation:

47a41b5b68b42e39247479d8b9a0c69

This may also be found at: /var/jenkins_home/secrets/initialAdminPassword

*************************************************************
*************************************************************
*************************************************************
...
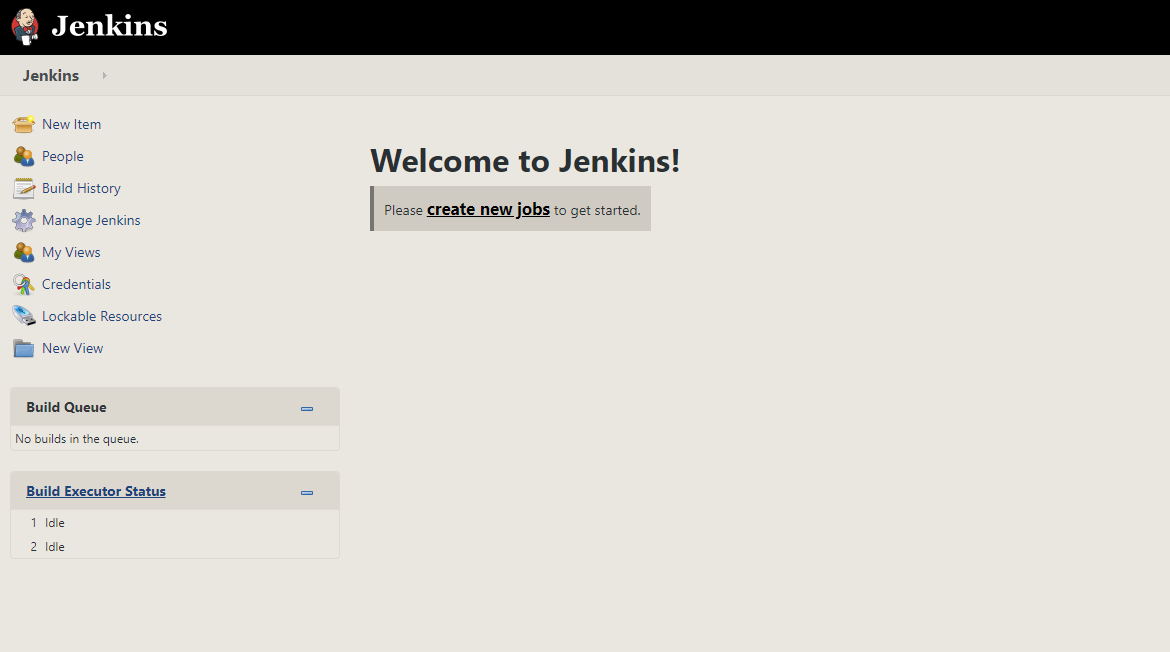
Then install the recommended plugins and create your admin user.
You can now start using Jenkins and create your first pipeline.
To infinity and beyond …
Scaling
In order to use all the power offered by k8s, we could want a scalable Jenkins.
One of the strongest sides of Jenkins is that it has a scaling feature almost out-of-the-box. Jenkins’ scaling is based on the master/slaves model, where you have a number of agent instances (called slaves) and one main Jenkins instance (called master), which is responsible mainly for distributing jobs across slaves.
Sounds good right?
There are plenty of options available to implement Jenkins scaling. We will focus on the Kubernetes plugin.
It allows to run dynamic agents in a Kubernetes cluster by creating a Kubernetes Pod for each agent started.
It gives us a lot of benefits:
- Ability to run many more build
- Automatically spinning up and removing slaves based on need, which saves costs
- Distributing the load across different physical machines while keeping required resources available for each specific build
On your Jenkins web ui select and install the kubernetes plugin:
Manage Jenkins |> Manage Plugins |> Available |> Kubernetes
Now, it’s time to configure the plugin:
Manage Jenkins |> Manage Nodes and Clouds |> Configure Clouds |> Add a new cloud |> Kubernetes |> Kubernetes Cloud details...
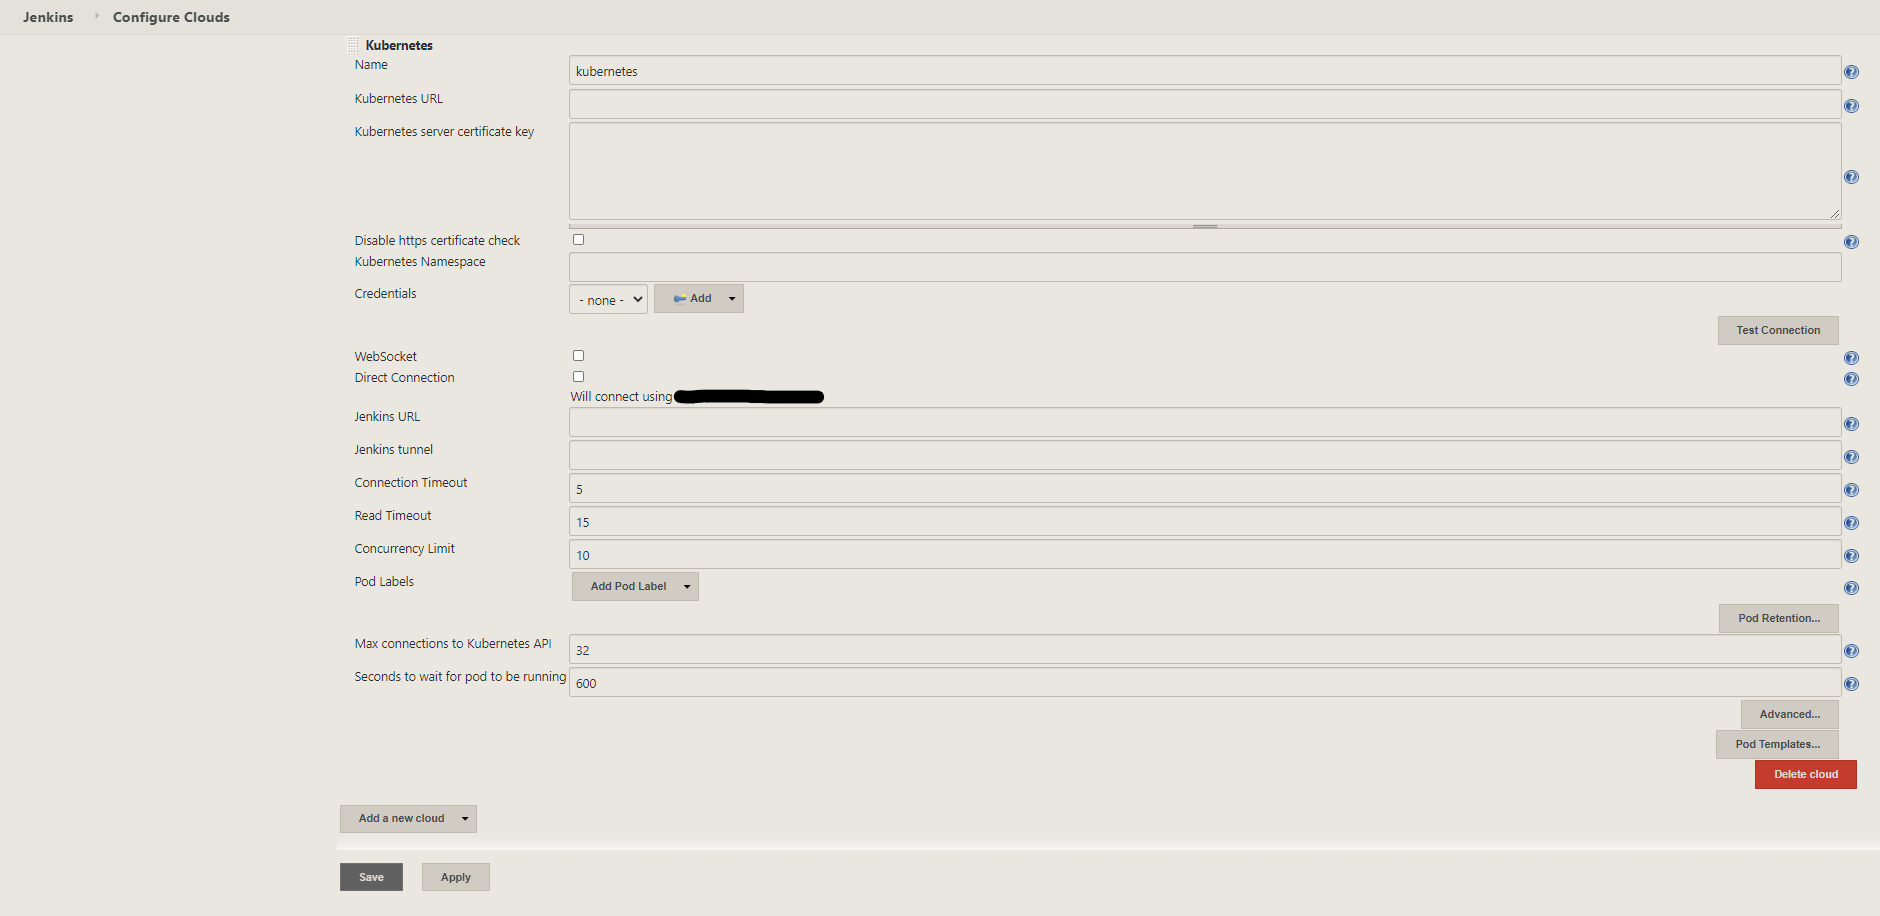
We need several things for the configuration:
- Cluster URL
- Cluster credential
- Jenkins URL
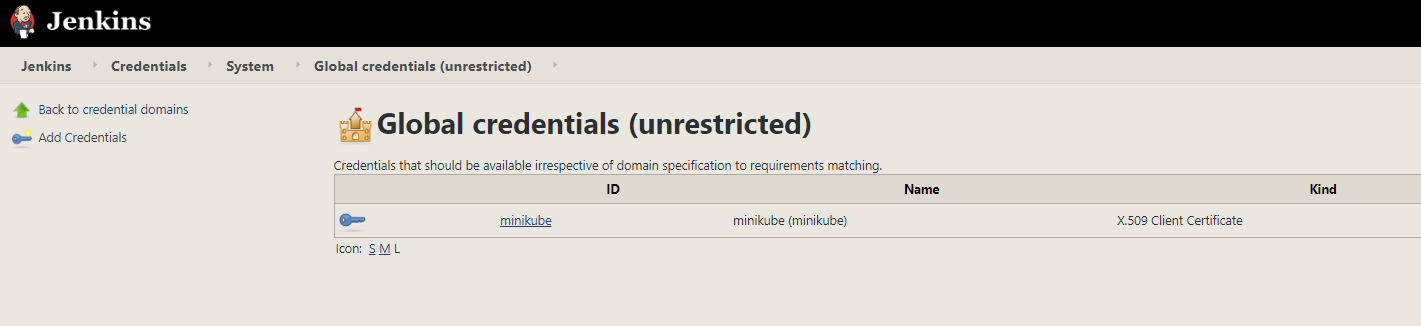
In order to connect to the cluster, we should have some credential (like your kubectl context). We will use a X.509 Client Certificate secret type. To add a new secret, go to:
Credentials |> global |> Add Credentials
Select X.509 Client Certificate under the Kind dropdown.
To get the client key, client certificate and Server CA Certificate, we can do:
cat ~/.minikube/client.key
cat ~/.minikube/client.crt
cat ~/.minikube/ca.crt
Then add minikube as ID and a description.
The following will give us the cluster url, that we need to indicate in the Kubernetes URL field.
kubectl cluster-info | grep master
After filling out the kubernetes url and minikube credential, the connection test should be successful.
We can see that the configuration wants to default the jenkins url with http://<NodeIP>:30000. It’s not what we want. Instead, we will use the node url because the plugin will connect to the master inside the cluster using the port 50000.
To achieve that, we have to modify three things in our cluster:
- First, we want our deployment to expose port
50000and apply it. As we persist thejenkins_homefolder, there is no worry about deploying a new deployment.apiVersion: apps/v1 kind: Deployment metadata: name: jenkins namespace: jenkins spec: replicas: 1 selector: matchLabels: app: jenkins template: metadata: labels: app: jenkins spec: containers: - name: jenkins image: jenkins/jenkins ports: - name: http-ui containerPort: 8080 - name: jnlp containerPort: 50000 volumeMounts: - name: jenkins-home mountPath: /var/jenkins_home volumes: - name: jenkins-home persistentVolumeClaim: claimName: jenkins-pvckubectl apply -f jenkins-deployment.yaml - Secondly, we want a resilient configuration. That means we don’t want to give directly the NodeIP as it can change. We also need to be able to communicate on port
50000within our cluster. So, let’s create a service of typeClusterIPand expose both port8080and50000.
apiVersion: v1
kind: Service
metadata:
  name: jenkins-cip
  namespace: jenkins
spec:
  type: ClusterIP
  selector:
    app: jenkins
  ports:
  - name: master
    port: 8080
    targetPort: 8080
    protocol: TCP
  - name: jnlp
    port: 50000
    targetPort: 50000
    protocol: TCP
kubectl apply -f jenkins-services.yaml
- Finally, we want another persistent volume for our Jenkins workspace (the folder where Jenkins magic happens).
apiVersion: v1
kind: PersistentVolume
metadata:
  name: jenkins-workspace-pv
  namespace: jenkins
  labels:
    type: local
spec:
  capacity:
    storage: 10Gi
  accessModes:
    - ReadWriteMany
  hostPath:
    path: "/data/jenkins-data"
---
apiVersion: v1
kind: PersistentVolumeClaim
metadata:
  name: jenkins-workspace-pvc
  namespace: jenkins
spec:
  storageClassName: standard
  accessModes:
    - ReadWriteMany
  resources:
    requests:
      storage: 10Gi
kubectl apply -f jenkins-volumes.yaml
We can now fill out the Jenkins url with http://ClusterIP:8080. To get the ClusterIP part:
kubectl get svc -n jenkins
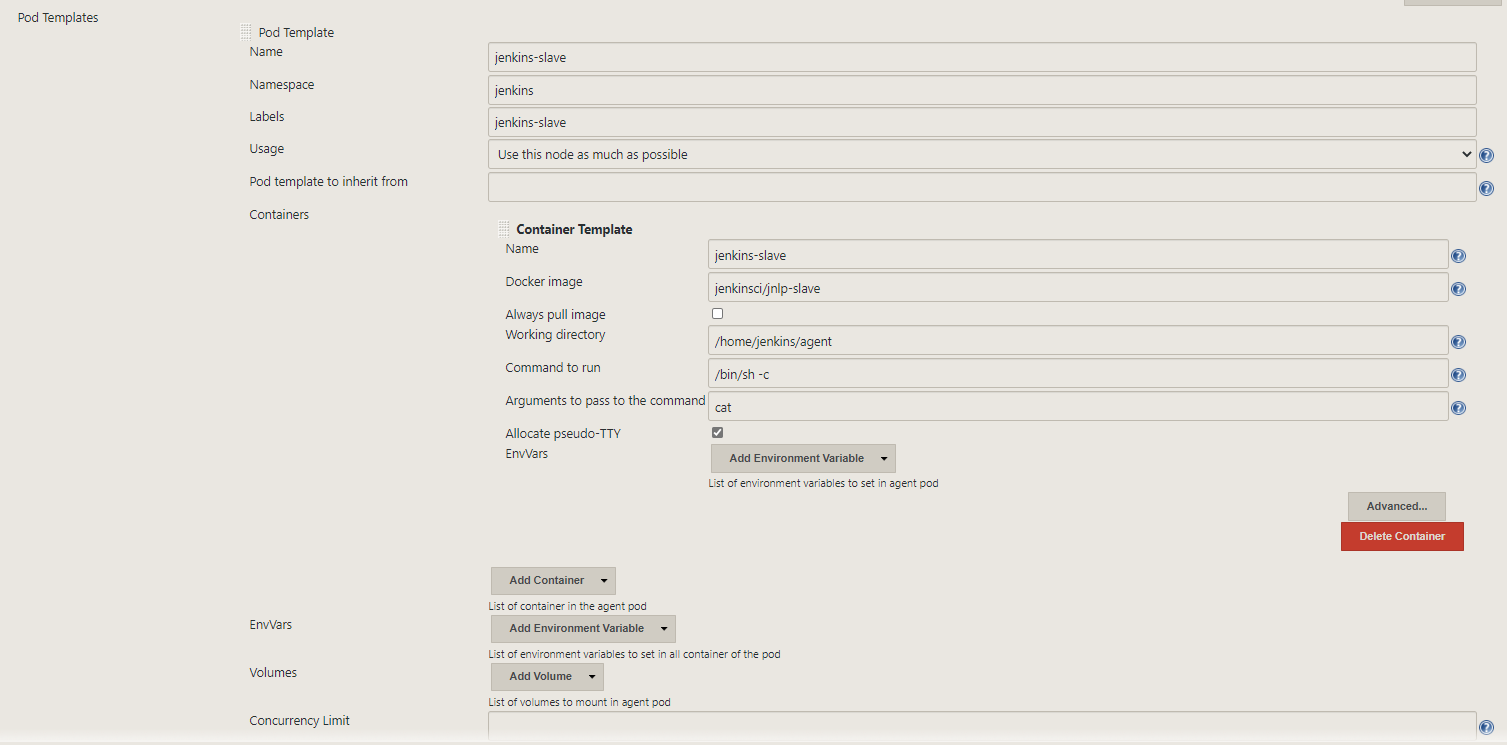
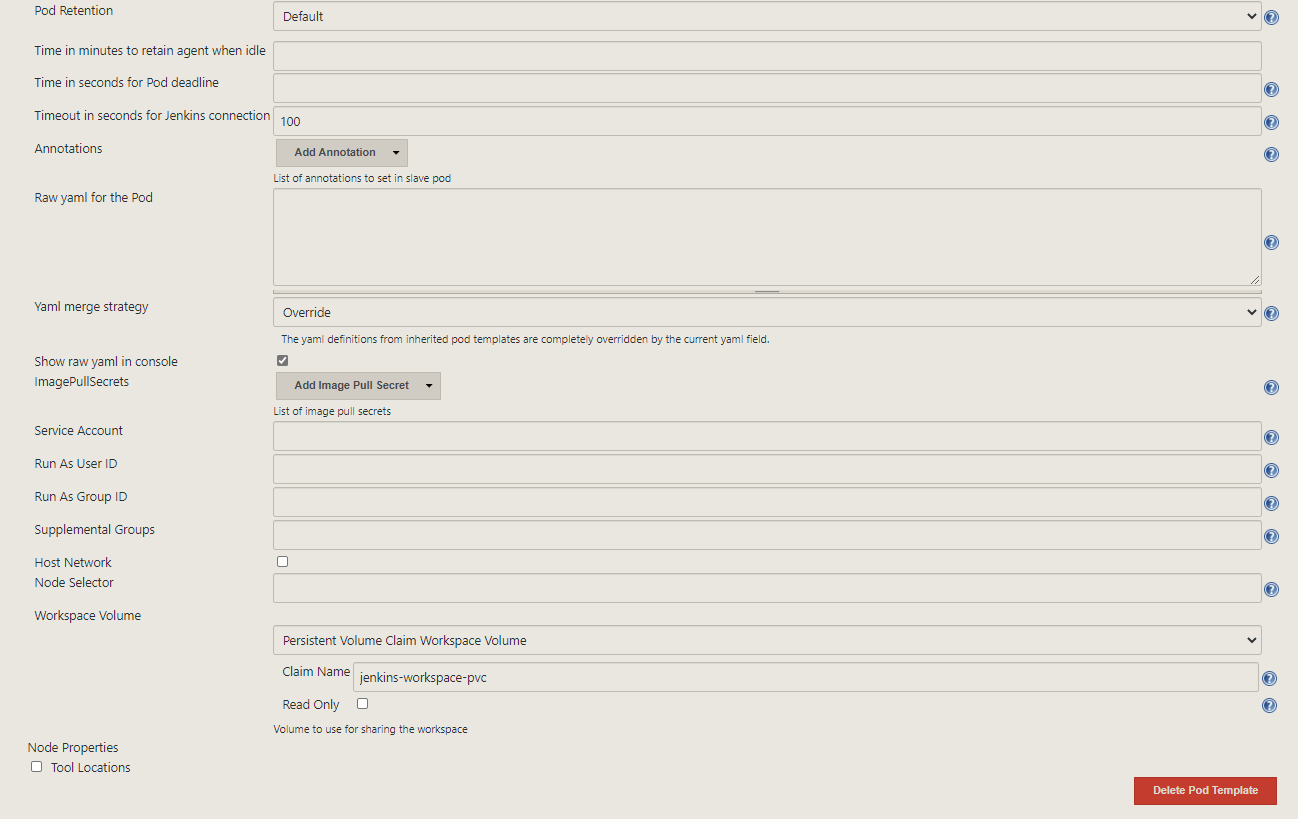
Then let’s add a pod template and fill it out as the following:
We are finally ready to try out the plugin.
Let’s create and name our pipeline:
New Item |> Pipeline
In the pipeline section we will put the following:
podTemplate(inheritFrom: 'jnlp-pod', containers: [
    containerTemplate(name: 'nginx', image: 'nginx', ttyEnabled: true, command: 'cat')
  ]) {

    node(POD_LABEL) {

        stage('cat nginx html')
        {
            container('nginx') {
                sh """
                echo "--- Cat nginx html ---"
                cat "/usr/share/nginx/html/index.html"
                """
            }
        }
    }
}
Automation
The best way to install the Jenkins master with our custom plugin is to create a docker image based on the official base image. Having your Jenkins setup as a Dockerfile is highly recommended to make your continuous integration infrastructure replicable and have it ready to setup from scratch. To install plugins on the Dockerfile:
FROM jenkins/jenkins

...
RUN /usr/local/bin/install-plugins.sh kubernetes
...